https://blog.jetapps.com/understanding-permissions/
[
Understanding Permissions
(Understanding Permissions – JetApps)
by blogadmin February 10, 2020
The privacy and security of client data should be the number one priority of every web hosting provider. Protecting against lost, stolen, or corrupt data is typically accounted for in a company’s backup plan. However, there is another critical area to think about when it comes to your client’s data.
File and folder permissions are key in order to ensure the right users have the correct access to each file on the server.
Linux file permissions are broken down into 2 categories:
Ownership
-
User – is the owner of the file. The creator of a file is set as the owner by default in most Linux distributions.
-
Group – a group can contain multiple users. All users of the same group will have the same permissions to the file. By design, most Linux distributions add the user to a group name that is the same as the user name.
-
Other – any other user that did not create the file or was part of a group that owns the file. Other is commonly referred to as setting permission for the “world”.
Permissions
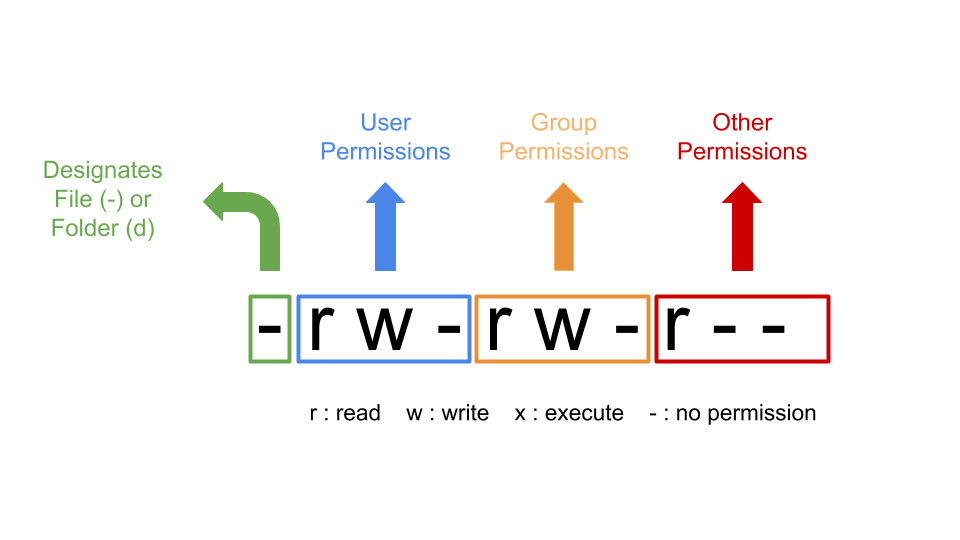
Every linux file and directory has the following 3 permissions:
-
Read – this gives you the authority to open and read the file. On a folder, you are given permissions to see a list of the content of the folder.
-
Write – this gives you the authority to modify or edit the contents of the file. On a folder, you are given the permissions to add, remove or rename files under that folder.
-
Execute – this gives you the authority to run a program file.
Here is an example of what a file type and access permissions look like inside the CLI (command line linux):
Use the “chmod” command to adjust permissions
For changing the access permissions of a file you would use the following syntax:
chmod permissions filename
Along with the symbolic mode/format above, you can also use the following three-digit absolute (numeric) mode as well:
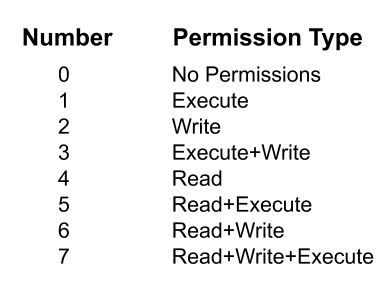
Here is an example of how to use the chmod command:
chmod 744 file123
The above command would set file123 to the following permissions:
user: read+write+execute | group: read | other: read
Use the “chown” command to adjust ownership
Changing the ownership of a file or folder can easily be done with the following command:
chown user
To change the user and group for a file or folder you would use this command:
chown user:group filename
If you only want to change the group owner you would use this command:
chgrp group_name filename
The #1 most common permissions mistake
The most common mistake for novice users is trying to change the owner for a user while running as root . Please see below:
(Running as root):

Although I am in the user’s homedir, I am actually asking the system to do a chown for the entire filesystem! … not good.
Note the “/” at the end. The correct way to run this command is as shown below, or to adopt best practices and never execute these as root (switch to user first).

Backing up your permissions
While most server administrators have a hard time admitting it, they can and do make mistakes on occasion. Whether it is giving a client full root access or allowing the “world” (the other user) the ability to read, write and execute nearly every file on the server, these types of scenarios can and will happen to even the most skilled technician out there.
Having proper backups of your permissions along with a clear process on how to restore them will keep you and your staff from going into full panic mode.
To backup system (not including USER) permission & ownership flags we can use a simple linux utility called “getfacl” (https://linux.die.net/man/1/getfacl). Using it with some “bash magic” & JetBackup will allow us to sleep better at night.
The following flow can be used to backup SYSTEM file permissions/ownerships.
*** Caution: Do not use this procedure to backup/restore USER file permissions or Ownerships ***
- Create bash script to export all permissions to a file:

- Place the file at – /root/backup_permissions.sh
Give the file exec permissions – chmod +x /root/backup_permissions.sh
Execute the script manually, it should create a folder named “facl” inside your home folder containing the exports.

- Next, we will configure JetBackup to pickup the “/home/facl” folder:
WHM → JETABACKUP → HOOKS → +Create New Hook:
Hook Name: backup facl
Hook Position: Pre
Hook Type: Backup
Backup Jobs: server_config_files
Hook Script: /root/backup_permissions.sh
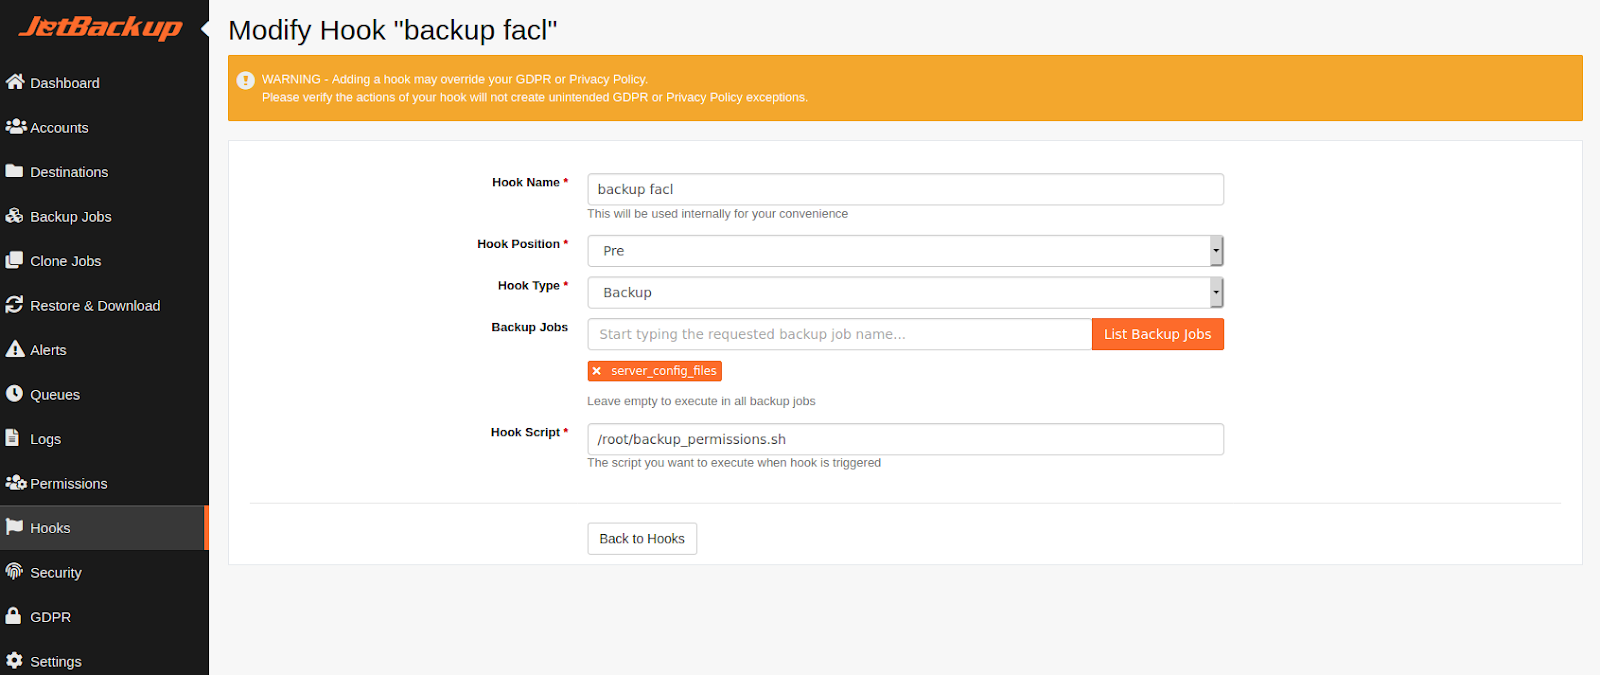
- Add the path /home/facl to a directory backup job inside JetBackup called “server_config_files”.
Restoring your permissions
When (not if) you or another staff member eventually makes a major error adjusting the permissions or ownership of files/folders, it is now time to restore your permissions. Well, most likely your system completely crashed so you will need to boot into recovery mode somehow and do some more “bash magic”.
- Create and run the following restore script:
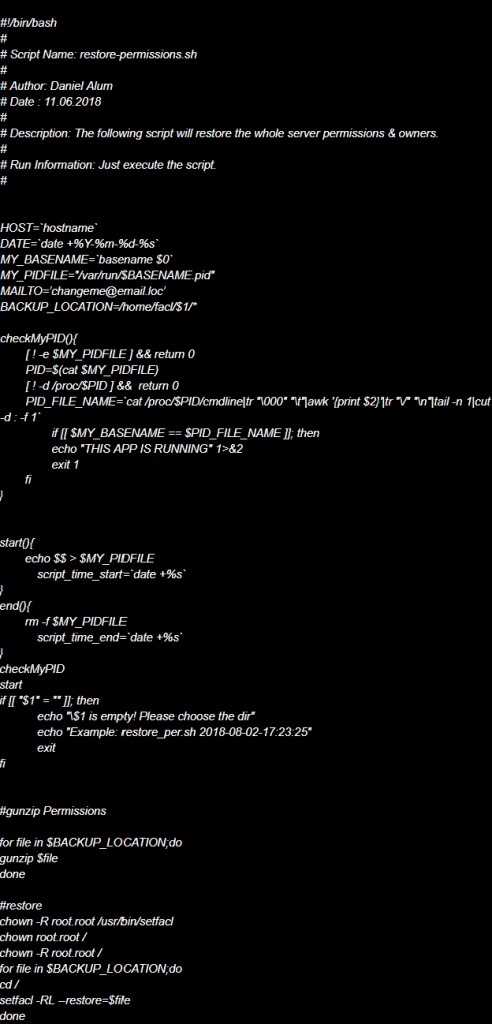
If you are running a cPanel server, we will also throw in a quick & dirty owner fix provided here: GitHub - PeachFlame/cPanel-fixperms: A script to fix permissions & ownership, on files & directories, for cPanel accounts.
Running a force upcp update is a good idea at this point as well.
Although JetBackup will push the facl exports into a remote folder, we recommend you also have a local copy. Be sure to keep a local copy of your restore script as well. This will allow easy access if you need to boot into recovery mode and only need to restore permissions for data that already exists.
https://blog.jetapps.com/understanding-permissions/
Curated by: https://www.ParagonHost.net
Est. 1999 | Paragon Host Internet Group | Web, Email, Workspace | Global Hosting Services
![]()