Overview
This article provides the instructions on how to create an indirect point-to-point link, also known as a repeated PtP link. A well-installed repeated PtP link is capable of supporting throughputs as high as 100Mbps for M devices, and 300+Mbps for AC devices.
Because this is a Layer-2 Transparent Bridge, it basically acts like a very long, invisible Ethernet cable. This article describes the steps to configure an indirect PtP link for both AC and M devices: the configuration is very similar with just small modifications that will be pointed out for each configuration.
Table of Contents
- Network Diagram
- [Before you Begin](https://help.ubnt.com/hc/en-us/articles/204952284-airMAX-Configure-an-Indirect-Point-to-Point-PtP-Link-Bridge-Repeater-#before%20you begin)
- Configuration for Radio Labeled 192.168.1.2
- Configuration for Radio Labeled 192.168.1.3
- Configuration for Radio Labeled 192.168.1.4
- Configuration for the Cable/DSL Modem
- Notes
- Related Articles
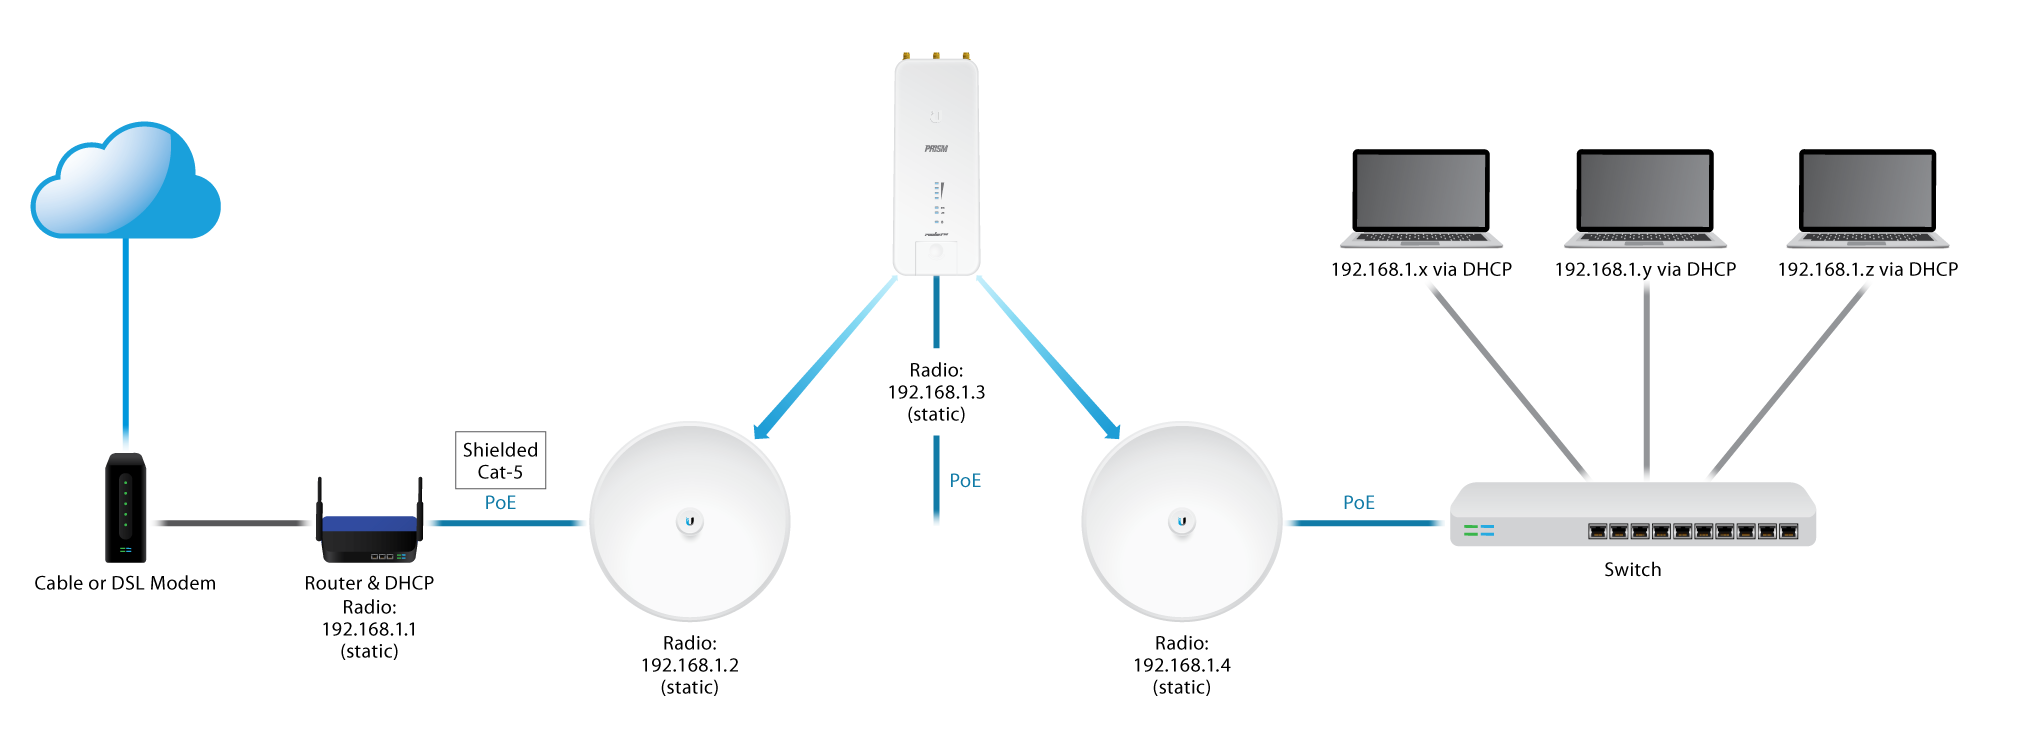
Network Diagram
Before you Begin
To configure and set up the indirect PtP system first follow these instructions:
- Restore your radio to factory default values. This is critical, especially if you are troubleshooting a problem.
- Connect the radio to your computer using an Ethernet cable.
- Using a web browser, enter 192.168.1.20 as the URL to gain access to the radio’s management console.
- Enter ubnt as the administration account and ubnt as the password.
- You are ready to configure each radio shown in the Network Diagram above. Only change the settings that are mentioned, everything else should remain as is.
Configuration for Radio Labeled 192.168.1.2
| AC Devices | M Devices |
|---|---|
| 1. Choose the ** | Wireless |
- Wireless Mode: Station
- Choose the |Network| tab, and only change:
-
IP Address: 192.168.1.2
-
Click the Save button|1. Choose the |Wireless| tab, and only change:
-
Wireless Mode: Station (Importaint)
-
WDS: Enable
-
Click the Change button
- Choose the |Network| tab, and only change:
- IP Address: 192.168.1.2
- Click the Change button
- Click the Apply button|
Configuration for Radio Labeled 192.168.1.3
| AC Devices | M Devices |
|---|---|
| 1. Repeat steps 1 through 4 from the [Before you begin](https://help.ubnt.com/hc/en-us/articles/204952284-airMAX-Configure-an-Indirect-Point-to-Point-PtP-Link-Bridge-Repeater-#before%20you begin) section. |
- Choose the |Wireless| tab, and only change:
- Wireless Mode: Access Point (Importaint)
- Choose the |Network| tab, and only change:
- IP Address: 192.168.1.3
-
Click the Save button.|1. Repeat steps 1 through 4 from the [Before you begin](https://help.ubnt.com/hc/en-us/articles/204952284-airMAX-Configure-an-Indirect-Point-to-Point-PtP-Link-Bridge-Repeater-#before%20you begin) section.
-
Choose the |Wireless| tab, and only change:
- Wireless Mode: Access Point
- WDS: Enable
- Click the Change button
- Choose the |Network| tab, and only change:
- IP Address: 192.168.1.3
- Press [Change] button
- Click the Apply button|
Configuration for Radio Labeled 192.168.1.4
| AC Devices | M Devices |
|---|---|
| 1. Choose the ** | Wireless |
- Wireless Mode: Station (Importaint)
- Choose the |Network| tab, and only change:
- IP Address: 192.168.1.4
- Click the Save button.|1. Choose the |Wireless| tab, and only change:
- Wireless Mode: Station
- WDS: Enable
- Click the Change button
- Choose the |Network| tab, and only change:
- IP Address: 192.168.1.4
- Press [Change] button
- Click the Apply button|
Configuration for the Cable/DSL Modem
- Reboot or power cycle the Cable/DSL modem off and on before using this link.
Notes
-
Select the correct cable. Use Ubiquiti ToughCable Pro shielded twisted pair data cable between your Power over Ethernet adapter and your radio. If the radio is being co-located in an area with a VHF pager, FM or TV broadcast transmitter, use Ubiquiti ToughCable Carrier cable. See our TOUGHCable Datasheet for more information.
-
Secure the radios. Modify the default administration account name and password now. From the web management console:
- Go to System > System Accounts
- Administrative Username [change it]
- Hover over icon to the right, Change Password and modify it (for M devices, for AC devices simply Change Password ).
- Click the Change button. Then click the Apply button. (For M devices, for AC devices simply click the Save button)
- Secure the wireless signal. Encrypt the wireless connection. From the web management console:
- Go to Wireless > Wireless Security > Security > WPA2-AES
- WPA Preshared Key: enter a strong password
- Click the Change button. Then click the Apply button. (For M devices, for AC devices simply click the Save button)
- In the diagram above, the block of equipment after the Switch could be replaced with anything desired to bridge, including a SOHO Wi-Fi router, for example. This radio configuration acts like a simple Cat-5 cable.
Related Articles
airMAX - Configure a Point-to-Multipoint (PtMP) ISP-style Access Point
airMAX - How to Configure a Point-to-Point Link (Layer 2, Transparent Bridge)
airMAX - WDS on a Point to Point (PtP) Link
Curated by:

HostCheetah Networks
Global Web Hosting, Domain Registration and Internet Services
http://hostcheetah.net | http://hostcheetah.uk