https://www.sonicwall.com/support/knowledge-base/170505396170557
Configuring Layer 2 Bridge Mode in SonicOS Enhanced
![]() 12/06/2018
12/06/2018 ![]() 58
58 ![]() 15939
15939
DESCRIPTION:
SonicOS Enhanced firmware versions 4.0 and higher includes L2 (Layer 2) Bridge Mode , a new method of unobtrusively integrating a SonicWall security appliance into any Ethernet network. L2 Bridge Mode is ostensibly similar to SonicOS Enhanced’s Transparent Mode in that it enables a SonicWall security appliance to share a common subnet across two interfaces, and to perform stateful and deep-packet inspection on all traversing IP traffic, but it is functionally more versatile.
In particular, L2 Bridge Mode employs a secure learning bridge architecture, enabling it to pass and inspect traffic types that cannot be handled by many other methods of transparent security appliance integration. Using L2 Bridge Mode, a SonicWall security appliance can be non-disruptively added to any Ethernet network to provide in-line deep-packet inspection for all traversing IPv4 TCP and UDP traffic. In this scenario the SonicWall UTM appliance is not used for security enforcement, but instead for bidirectional scanning, blocking viruses and spyware, and stopping intrusion attempts.
Unlike other transparent solutions, L2 Bridge Mode can pass all traffic types, including IEEE 802.1Q VLANs (on SonicWall NSA appliances), Spanning Tree Protocol, multicast, broadcast, and IPv6, ensuring that all network communications will continue uninterrupted.
RESOLUTION:
Configuring the Primary Bridge Interface
Choose an interface to act as the Primary Bridge Interface. In this example, we will use X1 (automatically assigned to the Primary WAN): Network | Interfaces
Step 1: Select the Network tab, Interfaces folder from the navigation panel.
Step 2: Click the Configure icon in the right column of the X1 (WAN) interface.
Step 3: Configure the interface with a Static IP address (e.g. 192.168.160.50).

NOTE: The Primary Bridge Interface must have a Static IP assignment.
Step 4: Configure the default gateway. This is required for the security appliance itself to reach the Internet. (This applies only to WAN interfaces.)
Step 5: Configure the DNS server. (This applies only to WAN interfaces.)
Step 6: Configure management (HTTP, HTTPS, Ping, SNMP, SSH, User Logins, HTTP Redirects).
Step 7: Click OK .
Configuring the Secondary Bridge Interface
Choose an interface to act as the Secondary Bridge Interface. In this example, we will use X0 (automatically assigned to the LAN): Network | Interfaces
Step 1: On the Network | Interfaces page, click the Configure icon in the right column of the X0 (LAN) interface.
Step 2 : In the IP Assignment drop-down list, select Layer 2 Bridged Mode .
Step 3: In the Bridged to drop-down list, select the X1 interface.
Step 4: Configure management (HTTP, HTTPS, Ping, SNMP, SSH, User Logins, HTTP Redirects).
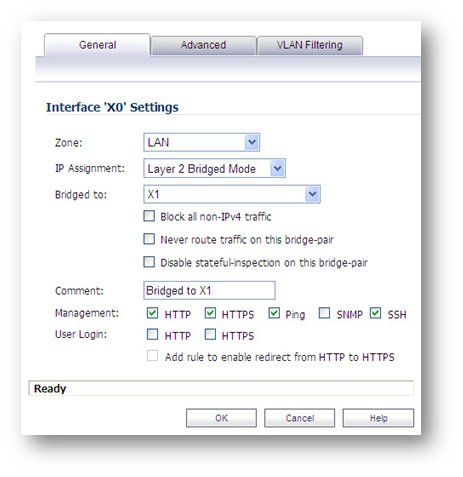
Step 5: You may optionally enable the Block all non-IPv4 traffic setting to prevent the L2 bridge from passing non-IPv4 traffic. VLAN Filtering (on SonicWall NSA series appliances)
You may also optionally navigate to the VLAN Filtering tab to control VLAN traffic through the L2 bridge. By default, all VLANs are allowed:
– Select Block listed VLANs (blacklist) from the drop-down list and add the VLANs you wish to block from the left pane to the right pane. All VLANs added to the right pane will be blocked, and all VLANs remaining in the left pane will be allowed.
– Select Allow listed VLANs (whitelist) from the drop-down list and add the VLANs you wish to explicitly allow from the left pane to the right pane. All VLANs added to the right pane will be allowed, and all VLANs remaining in the left pane will be blocked.
Step 6: Click OK .

The Network | Interfaces page displays the updated configuration: You may now apply security services to the appropriate zones, as desired. In this example, they should be applied to the LAN, WAN, or both zones.
Resolution for SonicOS 6.5 and Later
SonicOS 6.5 was released September 2017. This release includes significant user interface changes and many new features that are different from the SonicOS 6.2 and earlier firmware. The below resolution is for customers using SonicOS 6.5 and later firmware.
Configuring the Primary Bridge Interface
Choose an interface to act as the Primary Bridge Interface. In this example, we will use X2 interface (WAN). Follow below steps to configure X2 interface as WAN
Login to your Sonicwall management page and click on Manage tab on top of the page
- Navigate to Network -> Interfaces page, click configure button of X2 interface.
- Zone: WAN.
- IP Assignment: Static .
- IP Address: 192.168.160.50 (In this example we configured 192.168.160.0/24 subnet).
- Configure Subnet Mask, Default Gateway, DNS Server 1, DNS Server 2 & DNS Server 3 .
- Enable or Disable Management & User login of new zone based on your requirement.
- Click OK button to save settings
.
NOTE: The Primary Bridge Interface must have a Static IP assignment.
Configuring the Secondary Bridge Interface
Choose an interface to act as the Secondary Bridge Interface. In this example, we will use X0 (automatically assigned to the LAN) .
Login to your Sonicwall management page and click on Manage tab on top of the page.
- Navigate to Network -> Interfaces page, click configure button of X0 interface.
- Zone: LAN .
- Mode / IP Assignment: Layer 2 Bridge Mode (IP Route Option ).
- Bridged to: X2 .
- Enable Management & User Login if you want to manage it.
- Click OK button to save settings

You may optionally enable the Block all non-IPv4 traffic setting to prevent the L2 bridge from passing non-IPv4 traffic. VLAN Filtering (on SonicWall NSA series appliances)
You may also optionally navigate to the VLAN Filtering tab to control VLAN traffic through the L2 bridge. By default, all VLANs are allowed:
– Select Block listed VLANs (blacklist) from the drop-down list and add the VLANs you wish to block from the left pane to the right pane. All VLANs added to the right pane will be blocked, and all VLANs remaining in the left pane will be allowed.
– Select Allow listed VLANs (whitelist) from the drop-down list and add the VLANs you wish to explicitly allow from the left pane to the right pane. All VLANs added to the right pane will be allowed, and all VLANs remaining in the left pane will be blocked.

The Network | Interfaces page displays the updated configuration: You may now apply security services to the appropriate zones, as desired. In this example, they should be applied to the LAN, WAN, or both zones.
Curated by Liquid Layer Networks
At Liquid Layer Web Hosting [LiquidLayer.net], we’ve made a shared web hosting platform that’s both feature-rich and easy to make use of. Our programmers have built up a custom Linux cloud web hosting platform plus an innovative Control Panel that perfectly takes advantage of its capabilities. After long hours of programming and bug fixing on our end, we are now capable to guarantee that all of our shared web hosting services are safe, virus-free, full of capabilities and very easy-to-work-with. In addition, they feature 99.9% server uptime as well as 99.9% network uptime warranties.
Powered by:

HostCheetah Networks
Global Web Hosting, Domain Registration, and Internet Services
https://hostcheetah.net | http://hostcheetah.uk
PC Helper | Est 1996 - Web Hosting | US, AU, UK, Finland, Bulgaria | ![]()
https://pchelper.com