How to Configure High Availability (HA)
![]() 05/15/2019
05/15/2019 ![]() 1907
1907 ![]() 48925
48925
DESCRIPTION:
This article explains how to configure High Availability on 2 SonicWall Appliances.
![]() CAUTION: HA does not support Portshield interfaces and Native Bridge mode.
CAUTION: HA does not support Portshield interfaces and Native Bridge mode.
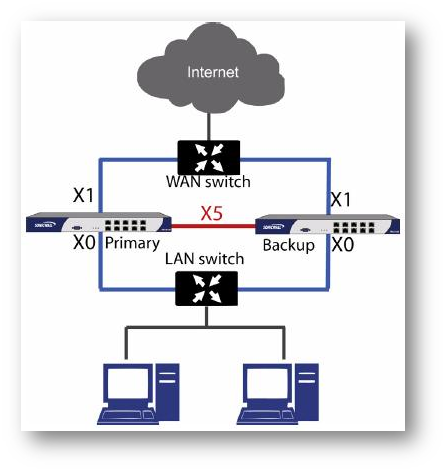
- The LAN (X0) interfaces are connected to a switch on the LAN network. The WAN (X1) interfaces are connected to another switch, which connects to the Internet.
- The dedicated HA interfaces are connected directly to each other using a crossover cable.
![]() NOTE: If you are connecting the Primary and Backup appliances to an Ethernet switch that uses the spanning tree protocol, please be aware that it may be necessary to adjust the link activation time on the switch port that the SonicWall interfaces connect to. For example, on a Cisco Catalyst-series switch, it is necessary to activate spanning tree port fast for each port connecting to the SonicWall security appliance’s interfaces.
NOTE: If you are connecting the Primary and Backup appliances to an Ethernet switch that uses the spanning tree protocol, please be aware that it may be necessary to adjust the link activation time on the switch port that the SonicWall interfaces connect to. For example, on a Cisco Catalyst-series switch, it is necessary to activate spanning tree port fast for each port connecting to the SonicWall security appliance’s interfaces.
- Refer to Stateful and Non-Stateful High Availability Prerequisites
- Associating Appliances on MySonicWall for High Availability
- Associating an Appliance at First Registration
- Associating Pre-Registered Appliances
- Associating a New Unit to a Pre-Registered Appliance
- Removing an HA Association
- Replacing a SonicWall Security Appliance
RESOLUTION:
![]() TIP: Before following this guide, please disable the PortShield and Native Bridge mode on both primary and secondary appliances: How to disable PortShield
TIP: Before following this guide, please disable the PortShield and Native Bridge mode on both primary and secondary appliances: How to disable PortShield
![]() CAUTION: If the secondary contains any configuration, please do a factory reset: Reset the firewall to factory default settings when the firewall is accessible and after the reset, disable the PortShield.
CAUTION: If the secondary contains any configuration, please do a factory reset: Reset the firewall to factory default settings when the firewall is accessible and after the reset, disable the PortShield.
The first task in setting up High Availability after initial setup is configuring the High Availability | Base Setup page on the Primary SonicWall security appliance. Once you configure High Availability on the Primary SonicWall security appliance, you push out the settings to the Backup SonicWall security appliance. To configure High Availability on the Primary SonicWall, perform the following steps:
- Login to the SonicWall Management Interface.
- Click Manage in the top navigation menu.
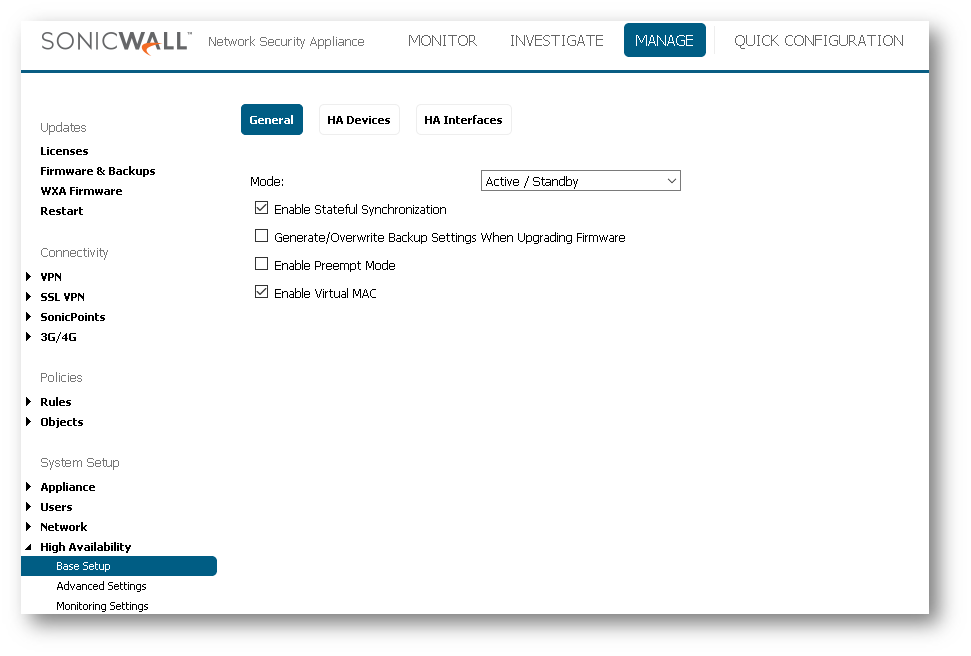
- Click High Availability | Base Setup .
-
Configure the Mode as " Active / Standby "
-
Check " Enable Stateful Synchronization "
-
Check " Enable Virtual MAC ". Virtual MAC allows the Primary and Backup appliances to share a single MAC address. This greatly simplifies the process of updating network routing tables when a failover occurs. Only the WAN or LAN switch to which the two appliances are connected needs to be notified. All outside devices will continue to route to the single shared MAC address.
-
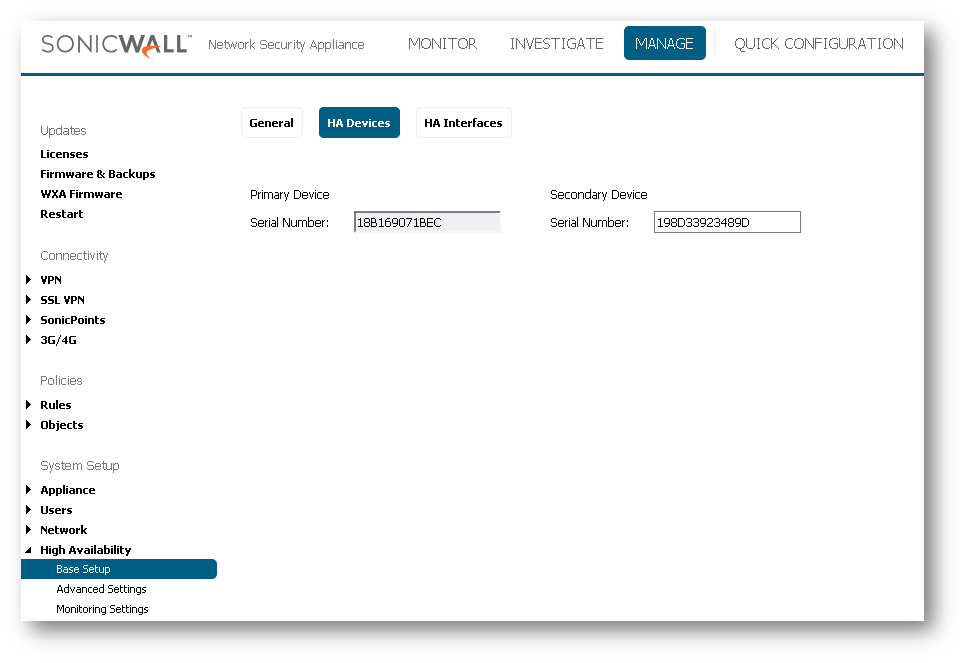
Move to the " HA Devices " tab and type the serial number of the secondary device.
-
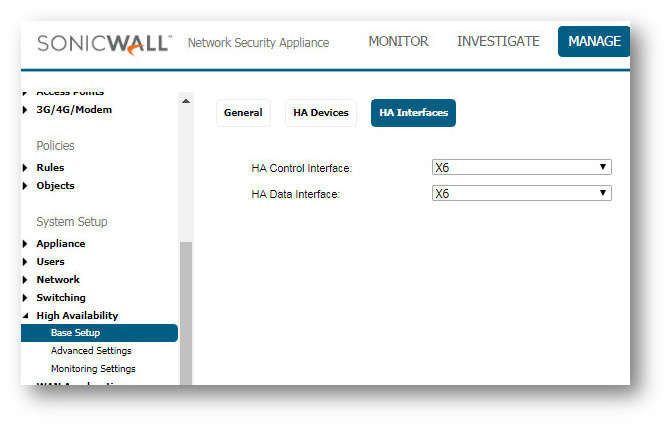
Move to the " HA Interfaces " tab and select your HA Control Interface
Click Accept/Apply to retain these settings.
Now, the Primary appliance should find the secondary and start to synchronize firmware (if different) and settings with the secondary. If not, please make sure that
- you have disabled PortShield and Native Bridge mode on all the interfaces of both appliances
- Backup Serial Number uner “HA Devices” tab is correct
- Devices are correctly associated on MySonicWall under the same account as HA Pair.
- They’re cabled together using the interface selected as HA Control Interface.
![]() NOTE: If not using Stateful HA Failover, select Enable Preempt Mode. This feature controls the behavior in which the Primary unit will seize the Active role from the Backup after it recovers from an error condition, reboot or firmware upgrade, after it successfully communicates to the backup unit that it is in a verified operational state. Preempt mode is not recommended when enabling Stateful High Availability, because preempt mode forces additonal synchronizations of traffic, which is not recommended on high load networks.
NOTE: If not using Stateful HA Failover, select Enable Preempt Mode. This feature controls the behavior in which the Primary unit will seize the Active role from the Backup after it recovers from an error condition, reboot or firmware upgrade, after it successfully communicates to the backup unit that it is in a verified operational state. Preempt mode is not recommended when enabling Stateful High Availability, because preempt mode forces additonal synchronizations of traffic, which is not recommended on high load networks.
Configuring Advanced High Availability Settings
- In the left navigation pane, click High Availability | Advanced .
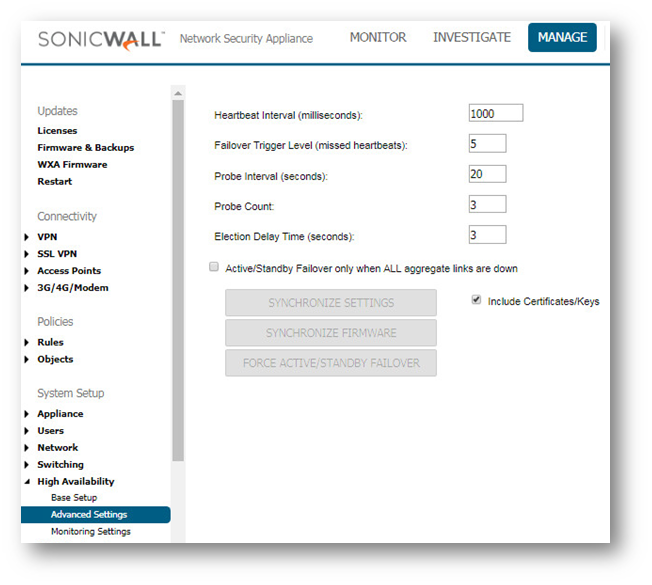
The settings it shows are minimum recommended values. Lower values may cause unnecessary failovers, especially when the SonicWall is under a heavy load. You can use higher values if your SonicWall handles a lot of network traffic.
2. To back up the firmware and settings when you upgrade the firmware version, select Generate/Overwrite Backup Firmware and Settings When Upgrading Firmware .
3. Optionally adjust the Heartbeat Interval to control how often the two units communicate. The default is 5000 milliseconds; the minimum recommended value is 1000 milliseconds. Less than this may cause unnecessary failovers, especially when the SonicWall is under a heavy load.
4. Set the Probe Level for the interval in seconds between communication with upstream or downstream probe targets. SonicWall recommends that you set the interval for at least 5 seconds. You can set the Probe IP address(es) on the High Availability | Monitoring screen.
5. Typically, SonicWall recommends leaving the Failover Trigger Level (missed heart beats), Election Delay Time (seconds) timers to their default settings. These timers can be tuned later as necessary for your specific network environment.
6. Select the Include Certificates/Keys checkbox to have the appliances synchronize all certificates and keys.
Heartbeat Interval (seconds) This timer is the length of time between status checks. By default this timer is set to 5 seconds; using a longer interval will result in the SonicWall taking more time to detect when/if failures have occurred.
Failover Trigger Level (missed heart beats) This timer is the number of heartbeats the SonicWall will miss before failing over. By default, this time is set to 5 missed heart beats.This timer is linked to the Heartbeat Interval timer for example, if you set the Heartbeat Interval to 10 seconds, and the Failover Trigger Level timer to 5, it will be 50 seconds before the SonicWall fails over.
Probe Interval This timer controls the path monitoring speed. Path monitoring sends pings to specified IP addresses to monitor that the network critical path is still reachable. The default is 20 seconds, and the allowed range is from 5 to 255 seconds.
Election Delay Time This timer can be used to specify an amount of time the SonicWall will wait to consider an interface up and stable, and is useful when dealing with switch ports that have a spanning-tree delay set.
Further information about the Advanced Page:
- Click Synchronize Settings to manually synchronize the settings between the Primary and Backup appliances: the Backup unit will reboot.
- Click Synchronize Firmware if you previously uploaded new firmware to your Primary unit while the secondary unit was offline, and it is now online and ready to upgrade to the new firmware. Synchronize Firmware is typically used after taking your secondary appliance offline while you test a new firmware version on the Primary unit before upgrading both units to it.
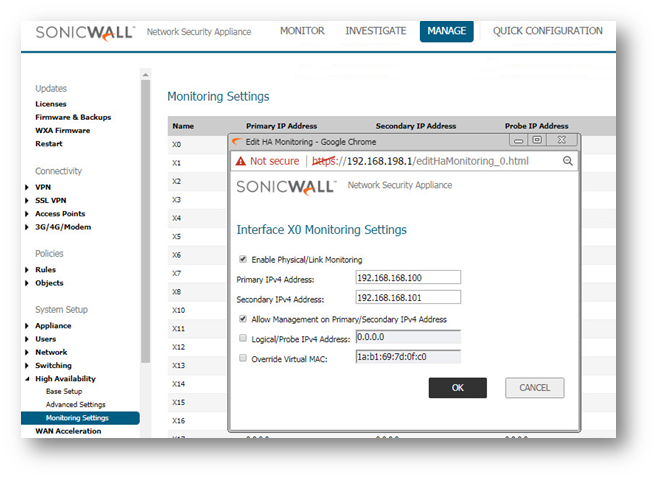
Configuring High Availability | Monitoring settings
On the High Availability | Monitoring page, you can configure unique management IP addresses for both units in the HA Pair which allows you to log in to each unit independently for management purposes: Configuring High Availability | Monitoring settings
You can configure Logical/Probe IP address for SonicWall to monitor a reliable device on one or more of the connected networks. Failure to periodically communicate with the device by the Active unit in the HA Pair will trigger a failover to the Idle unit.
![]() NOTE: The Primary IP Address and Backup IP Address fields must be configured with independent IP addresses on a LAN interface, such as X0, (or a WAN interface, such as X1, for probing on the WAN) to allow logical probing to function correctly.
NOTE: The Primary IP Address and Backup IP Address fields must be configured with independent IP addresses on a LAN interface, such as X0, (or a WAN interface, such as X1, for probing on the WAN) to allow logical probing to function correctly.
![]() TIP: The Monitoring IP is the one used by the Standby appliance to download licensing information.
TIP: The Monitoring IP is the one used by the Standby appliance to download licensing information.
Testing the configuration
- To verify that Primary and Backup SonicWall security appliances are functioning correctly, wait a few minutes, then power off the Primary SonicWall device. The Backup SonicWall security appliance should quickly take over.
- From your management workstation, test connectivity through the Backup SonicWall by accessing a site on the public Internet note that the Backup SonicWall, when Active, assumes the complete identity of the Primary, including its IP addresses and Ethernet MAC addresses.
- Log into the Backup SonicWall’s unique LAN IP address (Management IP). The management interface should now display Logged Into: Backup SonicWall Status: (green ball) Active in the upper right corner. If all licenses are not already synchronized with the Primary unit, navigate to the System | Licenses page and register this SonicWall security appliance on mysonicwall.com. This allows the SonicWall licensing server to synchronize the licenses.
- Now, power the Primary SonicWall back on, wait a few minutes, then log back into the management interface. The management interface should again display Logged Into: Primary SonicWall Status: (green ball) Active in the upper right corner.
- If you are using the Monitor Interfaces feature, experiment with disconnecting each monitored link to ensure that everything is working correctly.
![]() NOTE: Successful High Availability synchronization is not logged, only failures are logged.
NOTE: Successful High Availability synchronization is not logged, only failures are logged.
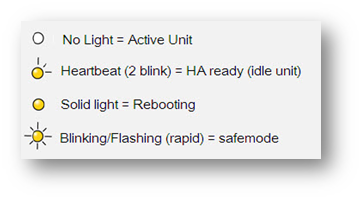
High Availability Test / wrench LED status:
Troubleshooting:
Tips for High Availability (HA) setup
Curated by: https://www.ParagonHost.net
Est. 1999 | Paragon Host Internet Group | Web, Email, Workspace | Global Hosting Services
![]()